Showing posts with label How To. Show all posts

Wednesday, April 29, 2026

How to: Reserve a Cultural Pass Online

Did you know that you can use your library card to get into an assortment of venues throughout Oregon? From local parks to world class museums, our Cultural Pass Express program can open up a world of possibilities with the aid of your library card.

The best part? You can reserve your Cultural Pass online from the comfort of your own home. 

Here's how:


Step 1: Head to LINCC.org and find the "Cultural Pass Express" option on the left-hand side. 


Step 2: Click on "Reserve your Cultural Pass now". 


Step 3: Once inside, log in using the 8 digit barcode on your card and the 4 digit pin that you created when you signed up for your card. (If you don't remember your pin, call your local library branch and provide your card number)!


Step 4: Once logged in you will see the details of your Cultural Pass options. You will see how often you can receive a pass, what the display requirements are, accessibility, and hours. Scroll down to find the Cultural Pass you're interested in and click "Show first available offer."


Step 5: If reserving for the current day, select the green reserve button. If opting to reserve for a different date, select the blue highlighted "Reserve different date" link. 


Step 6: Once your correct date is reserved, you will enter your email address to receive your confirmation notice. Once you've entered your email address, you will hit the green continue button at the bottom. 


Step 7: Select the Print/Download button to save your pass. Once you select the print/download option you cannot cancel your reservation. Depending on the venue, you may be able to show your pass on your phone, however some passes require printing.*


Step 8:
Your finished pass will look similar to the image above. Enjoy your venue and don't forget to share your Cultural Pass experience with others! 

*No printer? No problem. Head to your closest library to print your document. To upload a document for printing at Sandy, click here. To upload a document for printing at Hoodland, click here


Wednesday, January 15, 2025

LINCC How To: How to Enable Your Checkout History

When you frequently use your library, it can be easy to forget which books you may have already read.  

However, did you know that you can enable your checkout history and keep track of all the items you've checked out? Here's how:  

Step 1: Head to LINCC.org

Step 2: Log in using the 8 digit number on your library card. Your pin will be the 4 digit pin you created when you signed up for the card. The Log In option is at the top of the page on the right hand side. 


Step 3: Once logged in, click on the My Account option in the upper right hand side of the site. 

Step 4: Here you will see all of your account details. Think of this as your LINCC hub where you can control your account. 

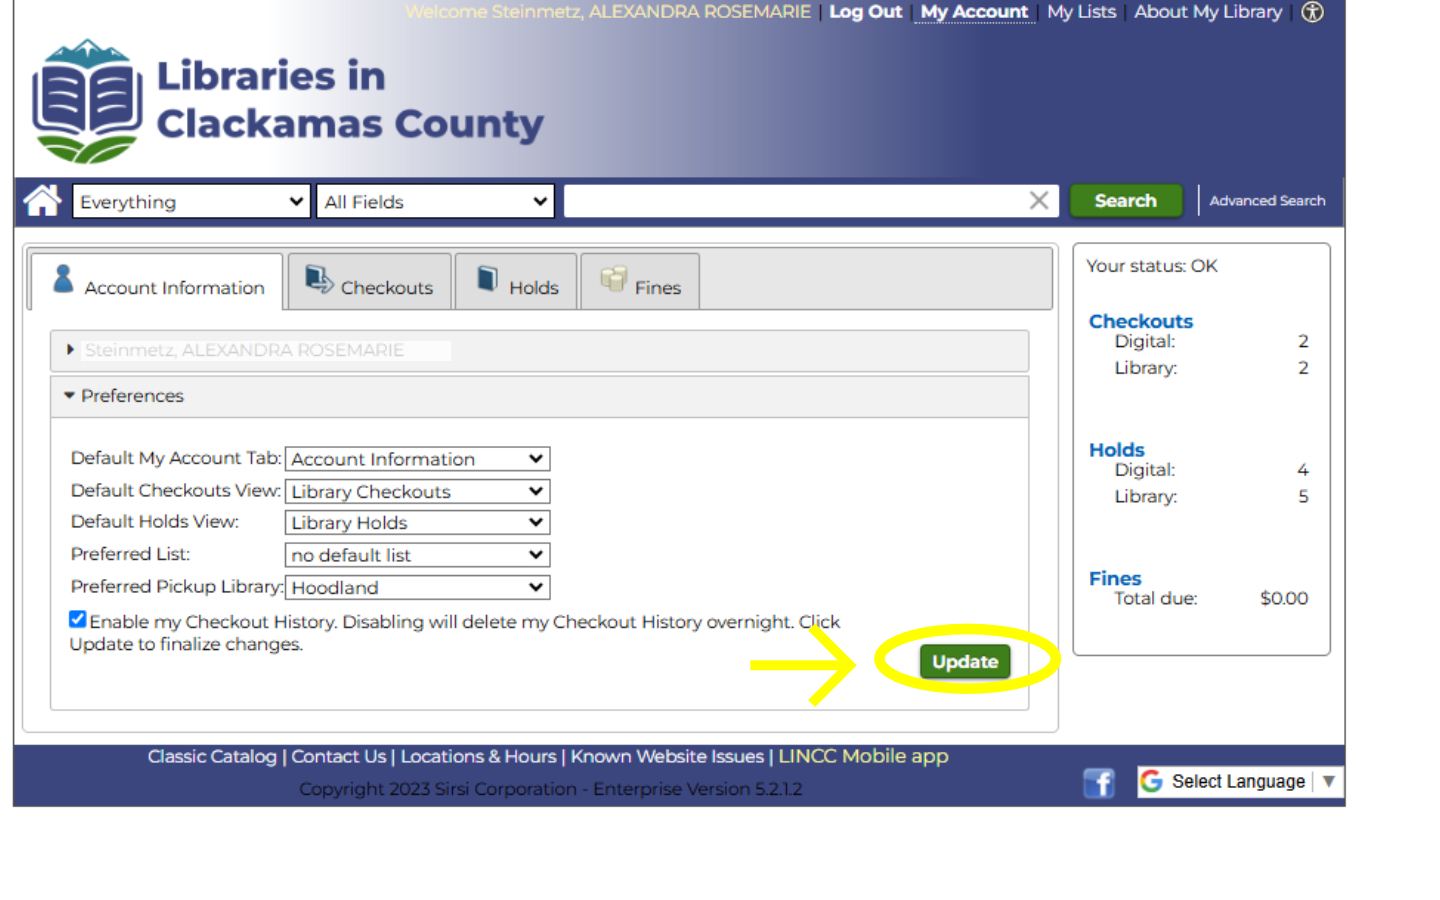
Step 5: Under the Account Information tab, towards the bottom, you will see the "Preferences" option. Click on "Preferences" to access the drop-down menu.

Step 6: Under the "Preferences" drop-down menu, you will see several drop-down menus, and at the bottom of these options, you will see the "Enable my Checkout History" box. 

Step 7: Click on the "Enable my Checkout History" box. 

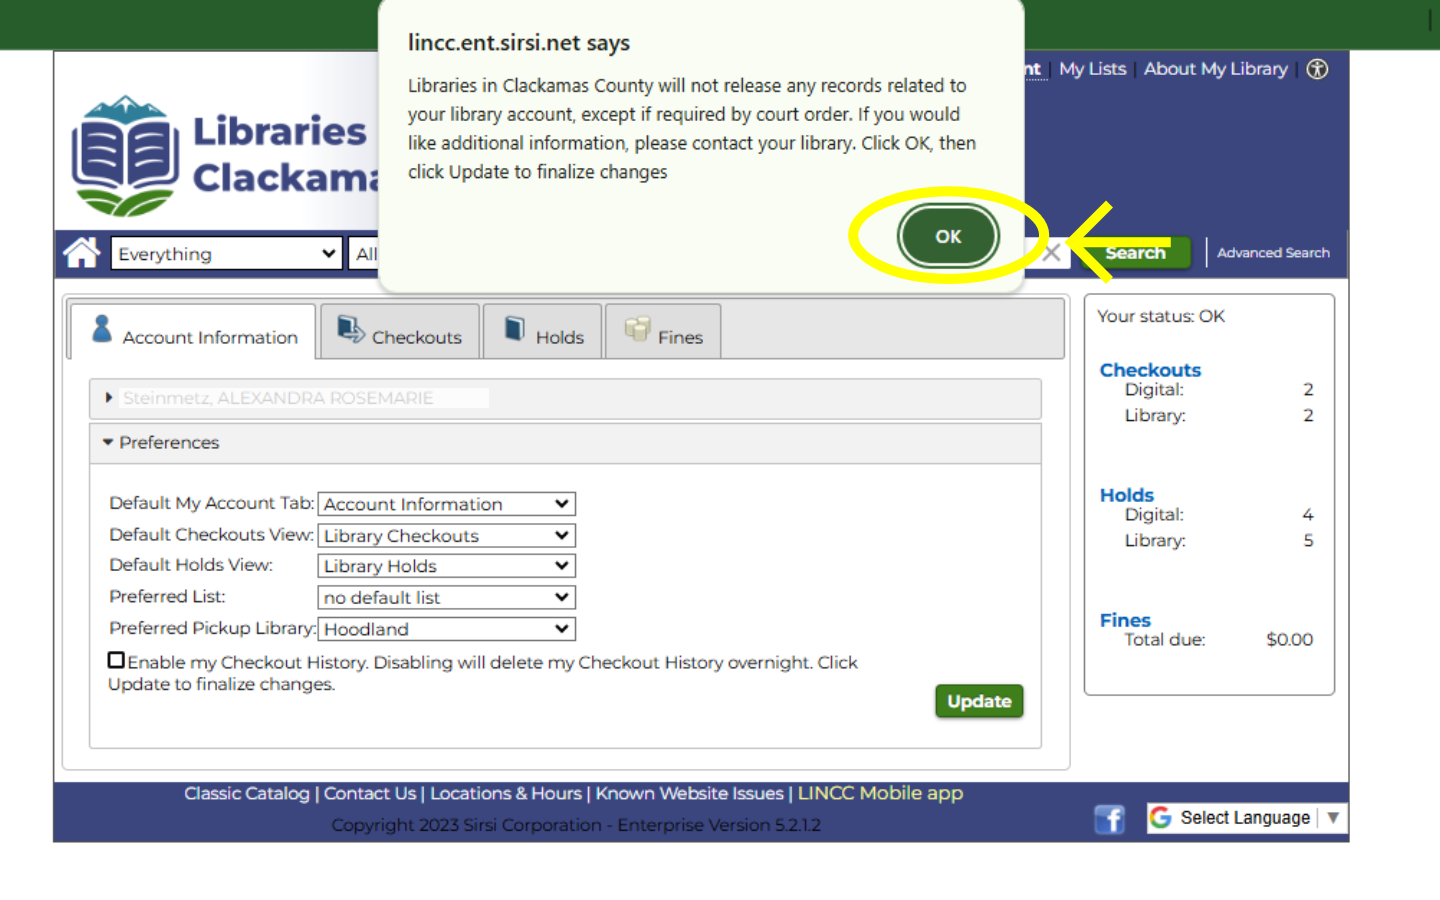
Step 8: Once you click on the "Enable my Checkout History" box, you will see a pop-up window that informs you that the Libraries in Clackamas County will not release any records related to your library account, except if required by court order. If you agree, click "Ok".


Step 9: One you've selected ok, you will hit the green "Update" button on the lower right-hand side of the screen. 

That's it! Going forward, all of your checked-out library materials will be listed on your account! 

To view your Checkout History, go into your account under the "Checkouts" tab. 


Select the "Checkout History" drop-down menu.

     
Here you will be able to view all of your checkout history (beginning the day you select "Enable my Checkout History.")

Questions? Feel free to stop by the info desk to learn more!


Saturday, November 2, 2024

LINCC How To: How to Renew Your Materials Online

Want a tip on how not to accrue fines? When you receive your due date reminder emails or notifications from LINCC, head to our website to renew your books, here's how: 

Step 1: Head to LINCC.org

Step 2: Log in using the 8 digit number on your library card. Your pin will be the 4 digit pin you created when you signed up for the card. The Log In option is at the top of the page on the right hand side. 


Step 3: Once logged in, click on the My Account option in the upper right hand side of the site. 

Step 4: Here you will see all of your account details. Think of this as your LINCC hub where you can control your account. 

Step 5: Click on the "Checkouts" tab (second tab from the left) to see all of the items you currently have checked out. 


Step 6: Once in your checkouts tab, you will select the items you want to renew by clicking on the checkbox icon next to the item title. (You can also renew all of your checked out items by selecting the "Select All" checkbox at the top left-hand side of the page next to the green Renew button. 


Step 7: Once you have selected the items you would like to renew, hit the green Renew button. 


Step 8: If the items were able to be renewed (they had no holds, and you have not maxed out your five renewals), you will see a "Checkout Successfully Renewed" message. 


If the item has holds, you will see an "Item has holds" message in red. 


And you've just renewed your library materials from home!

You can also do this via the LINCC phone app, here is a video explaining how.